Would you like to know what Internet users are doing on your website? To get your ad campaign results? To follow your prospects’ customer journey from the first page they land on all the way to conversion? To assess a newsletter’s click-through rate?
If you’re going to improve your marketing strategy and boost your performance, these questions need to be answered. But that means collecting data, lots and lots of data from your web pages. This is done by inserting snippets of code – marketing tags or tracking pixels – that will relay the information to an analytics platform of your choice. Fortunately, this complex and tedious operation can be handled with just a few clicks from a centralized interface thanks to Google Tag Manager (GTM).
What is Google Tag Manager, exactly? And how is it relevant to you? Let’s delve deeper into this tool that’s going to have you rethink everything you know about marketing!
What Is Google Tag Manager?
Google Tag Manager – or “GTM” – is a tracking tag management system. This platform implemented by Google is to tags what a CMS is to content. It provides an intuitive interface from which users can create tags and track their progress, all from one convenient place and without ever having to touch the code itself. That’s why Google refers to this tool as a Tag Management System, much like content can be handled through a Content Management System. The aim remains the same, to make the users’ lives easier.
Using tracking tags allows webmasters, marketers, and SEO experts to obtain a large quantity of information about a website’s users. Thanks to the data sent to the analysis tool, you can learn more about your audience, decipher its behaviour, and follow its customer’s journey step by step. It also let you know exactly what’s going on with a website, identify which content garners the most interest or which links receive the most clicks, etc.
All this data is essential when it comes to piloting your marketing strategy and steering it in the most relevant direction to maximize profitability. And it just so happens that data collection is only possible if a website features tags, which are at the very heart of Google Tag Manager.
What Is Google Tag Manager Used For?
To understand how Google Tag Manager can be useful, it’s important to understand the point of tracking tags. A tag is a snippet of code that is inserted in a web page in order to collect data and send it to a third party. For example, if you want to enable Google Analytics tracking, you first need to place suitable tags onto the pages you wish to monitor, usually through a Google Tag Manager extension. The same goes for measuring ad performance on Facebook (the term used in this case is “pixel”) or Google Ads (through “UA tags”).
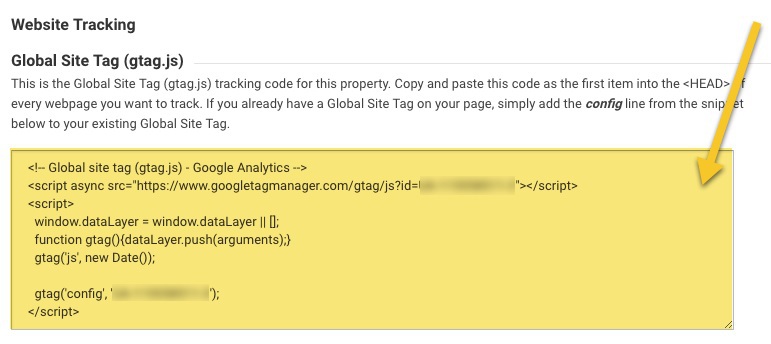
These tags provide instructions for the web crawlers to collect specific data and send it to the tool. These instructions are inserted within the page’s source code, staked out by tags, and invisible to the users. Here’s an example of what a Google Analytics tag looks like:

DATA COLLECTED THROUGH GOOGLE TAG MANAGER
What data can you collect (and monitor) using Google Tag Manager? Here are a few of the most common tag types:
- Number of times a piece of content (text, video…) has been viewed
- Number of link clicks (CTAs, ads, “add to basket” buttons, etc.)
- Number of times a product page has been viewed
- Best-selling products or services
- Number of times a mobile app or content has been downloaded
- Number of newsletter signups
- Cart abandonment rate
- Coupon or voucher use rate
- Etc.
You can use GTM to create and insert these tracking tags, allowing you to access the statistics you need from the pages selected. All without having to write a single line of tracking code thanks to convenient Google Tag Manager extensions.
THE BENEFITS OF GTM
There are three main benefits to using Google Tag Manager:
- The tags are grouped and managed from a single interface. This means that it is no longer necessary to write every code snippet manually on the pages you wish to monitor. All you need to do is insert a Tag Manager code within the site so that the tags can be implemented automatically and almost instantaneously on the required pages.
- The GTM system drastically reduces the risk of error since the tags are not coded manually. (Whereas a single error in the code could completely undo all the work it took to place your tags – by copying and pasting them from one page to the next. Google Tag Manager is the best way to avoid that.)
- It is so simple and flexible that you can create and monitor a large number of tags that serve you marketing objectives more closely. The whole system is designed to make the users’ lives easier. As an example, on WordPress, all you need to do is install a free Google Tag Manager extension (GTM4WP) that takes care of everything.
- And, finally, GTM is completely free.
GTM makes tag management much more straightforward. Thanks to this tool, you can easily add and remove tags, and insert them right where you need them without going anywhere near the code, making it simpler to collaborate with outside partners. It also lets you test your tags and fix any issues identified. All in all, with Google Tag Manager, there is no excuse not to collect data on your website’s performance!
How Does Google Tag Manager Work?
GTM is quite simple to use. The first step consists in creating an account by accessing the online tool (even if you already have a Google account), and configuring it by providing the information required: Account Name, Container Name (which, ideally, should be the name of the website in question), and your choice of platform.
GTM then gives you both parts of the container to be added to your website. The container is a piece of code that contains all the tags you wish to place within the website. Every time you create a new container, GTM gives you two pieces of container code that you need to insert: the first in the <head> section of the page, and the second after the <body> tag. (Don’t worry: Google Tag Manager will tell you exactly where to place them.) Once the code is implemented, you can define new tags and activate them to begin collecting data, following a configuration sequence. The information is sent from your website to your tag manager container through a JavaScript object called a “data layer”.
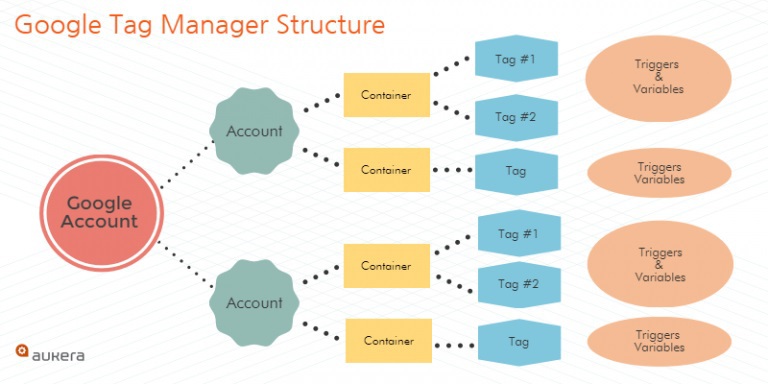
Before we go any further, there are a few more things you need to know about how GTM works. The tool is based on three pillars: tags, triggers, and variables. It’s important to understand what these three components are, as well as the role they play within the overall structure of Google Tag Manager. In essence, every account can create one or several containers, every container can be associated with one or several tags, and these tags are connected to triggers and variables – as you can see on the diagram below.

These three elements are accessible from the interface. Let’s go into the specifics.
TAGS
To create a new tag, you just need to click “Add a Tag”, and then configure it. Here, you have two choices. You can either use an existing tag from a third-party platform (Google Analytics, Google Ads, etc.) among one of the 80+ available; or you can create custom tags (HTML tags, image tags, or function tag) if what you’re looking for doesn’t already exist. Note that GTM doesn’t recommend doing this and suggests you ask the platform for pre-existing tags.
TRIGGERS
Tags don’t activate on their own. They need a trigger that detects a given event and launches the activation signal. A trigger is a lookout of sorts. It monitors your website, patiently waiting for a specific even to occur. And when it does, the trigger gives the order for the tags to turn on.
For every new tag, you need to set up a trigger by selecting it from a list. For example, it could be perusing a page, clicking, the user performing a certain action, etc.
VARIABLES
In GTM, variables are there to send word to the triggers to activate the tags when very specific conditions are met. Thus, you can configure a trigger to activate a tag when an event takes place (event tracking), but only during a given time window, or within a particular section of the website (if the user views a product page, for example).
These variables are also associated with the tags themselves. In this case, they specify the nature of the data to be collected, such as an email address or the price of a product at the time of purchase. Google Tag Manager natively integrates a large number of variables to choose from when configuring the tags and triggers. These cover most use cases, though you can still create them yourself if you wish.
That about sums up the main functionalities of Google Tag Manager you should need in order to familiarize yourself with this tool. Note that you can also preview the tags you have configured prior to validating them through the “Preview” mode. In this mode, you have access to the website’s page, and you can execute the action you have selected as the trigger to make sure everything is working correctly… and fix any potential issues!
In closing, GTM is both a powerful and easy-to-use tag management tool, which you can set up very quickly and use for all your marketing needs. Over time, by getting to know it better and to master its functionalities (thanks to the numerous extensions Google Tag Manager offers, such as Tag Assistant), you will get even more out of GTM. It will give you more precise and more relevant results you can use to optimize your marketing strategies.


